Enroll an Android device with WSO2 EMM
If you need to quickly setup and have a look at the capabilities of WSO2 EMM; easiest to configure and enroll is an Android device. First of all, download, WSO2 EMM from here.
Documentation provides all the information required for downloading the product.
IMPORTANT: Following only shows the out of the box experience of WSO2 EMM and it not a production ready setup.
5. The purpose of 4th step is to somehow visit the URL https://[SERVER_IP]:9443/emm-web-agent/enrollments/android/download-agent from the Android device. In a real scenario, the user will get an email with this address with an invitation to enroll to EMM. Whatever the method followed, it will bring up the following page on the mobile device,

6. Now click on Download Agent. Since the agent app is not from the Google play store, it is necessary to enable installing entrusted applications, by going to menu -> setting -> security on the Android device and enable, unknown sources.

7. Now once the download is complete, tap on the downloaded file and install the app by selecting "Package Installer". Follow the instruction until installation completes and open the app.
8. From their onward, follow the instruction given in the documentation.
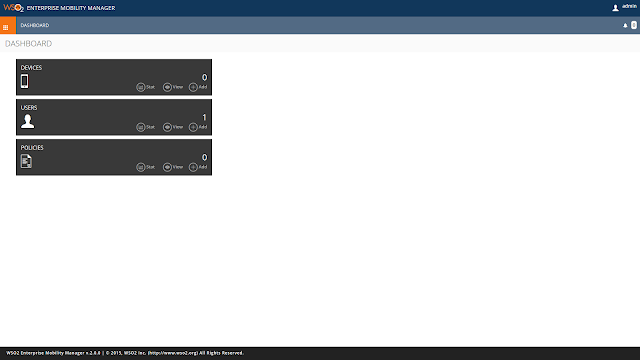
9. Once it is complete visit the EMM console(https://[SERVER_IP]:9443/emm), and it will list one device and where you can view the device and apply operation on it.
Documentation provides all the information required for downloading the product.
IMPORTANT: Following only shows the out of the box experience of WSO2 EMM and it not a production ready setup.
- Prior to running the server, make sure you have,
a. Installed Oracle Java SE(JDK/JRE) version 7 or 8
b. Both the server machine and the Android device you are enrolling are on the same WiFi network. - Once you download the server, extract the zip file to a desired location. Now from command prompt, go to the location of the extracted folder; lets call this EMM_HOME folder.
- On windows - wso2server.bat
- On Linux/Mac - sh wso2server.sh
Once the server start up complete, in the terminal, you will see the links to EMM console as bellow,
[2015-12-20 18:48:08,822] INFO {org.wso2.carbon.device.mgt.mobile.url.printer.URLPrinterStartupHandler} - EMM Console URL : https://10.10.10.203:9443/emm
[2015-12-20 18:48:08,850] INFO {org.wso2.carbon.core.internal.StartupFinalizerServiceComponent} - Server : WSO2 Mobile Device Manager-2.0.0-SNAPSHOT
[2015-12-20 18:48:08,851] INFO {org.wso2.carbon.core.internal.StartupFinalizerServiceComponent} - WSO2 Carbon started in 38 sec
[2015-12-20 18:48:08,998] INFO {org.wso2.carbon.ui.internal.CarbonUIServiceComponent} - Mgt Console URL : https://10.10.10.203:9443/carbon/
4. To enroll a device for testing purposes, we first need to download the agent application and install it on an Android device, their are two options,
Option 1. Enter the following url in a web browser of the Android device. https://[SERVER_IP]:9443/emm-web-agent/enrollments/android/download-agent
Replace [SERVER_IP] with the IP address/hostname of server.
Option 2. Go to the following address, from a web browser, https://[SERVER_IP]:9443/emm.
Replace [SERVER_IP] with the IP address/hostname of server. Add an security exception to your browser since SSL is not configured. When you get to the login screen, enter "admin" for both username and password. In the dashboard, click on add button under device section, which will present you with a QR code. Scan the QR code from your Android device(with a QR code reading app) and follow the URL.

5. The purpose of 4th step is to somehow visit the URL https://[SERVER_IP]:9443/emm-web-agent/enrollments/android/download-agent from the Android device. In a real scenario, the user will get an email with this address with an invitation to enroll to EMM. Whatever the method followed, it will bring up the following page on the mobile device,

6. Now click on Download Agent. Since the agent app is not from the Google play store, it is necessary to enable installing entrusted applications, by going to menu -> setting -> security on the Android device and enable, unknown sources.
7. Now once the download is complete, tap on the downloaded file and install the app by selecting "Package Installer". Follow the instruction until installation completes and open the app.
8. From their onward, follow the instruction given in the documentation.
9. Once it is complete visit the EMM console(https://[SERVER_IP]:9443/emm), and it will list one device and where you can view the device and apply operation on it.

Comments
Post a Comment